Did you know that you can create a beautiful card idea using your clear blocks and ink pads? This ‘Clear Block Stampin’ technique is easy to learn and can be applied using your favorite stamp sets and ink colors. Each time you try this technique you will get a different clear block result!
Place a flameless candle in this cute little box and use it as a décor item or fill a small cellophane bag with candy and use the box as a wrap for the candy.
SUPPLIES:
Stamp Set – Scary Cute (Cling 159850) * Buy as a Scary Cute Bundle (159852) and save 10%
Ink – Memento Ink (132708), Basic Black Stampin’ Blends (154843) Dark
Paper including cutting dimensions –
Basic Black Cardstock (121045) 10 3/4” x 5 ½”
Mango Melody Cardstock (146989) 11” x 3 ½”
Basic White Cardstock (159276) Scrap for tag
Cardstock Vellum (101856) 11” x 3 ½”
Accessories –
Scary Silhouettes Dies (159851) *
Linen Thread (104199)
Multipurpose Liquid Glue (110755)
Bone Folder (102300)
White ¼” Crinkled Seam Binding (151326)
Mini Glue Dots (103683)
Heat Tool (129053)
Take Your Pick (144107)
Paper Snips (103579)
Paper Trimmer (152392)
Stampin’ Cut & Emboss Machine (149653) or Mini Stampin’ Cut & Emboss Machine (150673)
Pencil with a sharp point
INSTRUCTIONS
1. Place the long side of the Basic Black cardstock along the top of the paper trimmer and score at 2 5/8”, 5 ¼”, 7 7/8”. And 10 ½”.
2. Turn the BB cardstock so the short end is at the top and score at 2”.
3. Place the other long side at the 3/8” mark on the other side of the paper trimmer track and mark the middle of each 2 5/8” section with a sharp pencil through the track. See photo 1 & 2.
4. Place the ‘tree’ die in the center of the first panel with the top of the die at the pencil mark and run through the Stampin’ Cut & Emboss machine. Repeat with the other three panels.
5. Use the paper snips to cut from the bottom edge up to the 2” horizontal score line along the vertical score lines. Trim off the 1/4” section below the 2” score line and cut a slight angle on the rest of the 1/4” section. See the photo below.
6. Use the frame to cut 4 panels from the cardstock vellum.
7. Stamp each of the single children on a vellum panel with Memento ink. Dry ink with a low setting on the Heat tool. If the image is not solidly black, fill in areas with the Dark Basic Black Stampin’ Blend. With the stamped side up, glue to the inside of the black cardstock with liquid glue covering the openings. The unstamped side of the vellum will be to the outside of the box.
8. Cut 4 of the tree die combined with the frame from the Mango Melody cardstock. Use the paper snips to cut off the branches leaving just a narrow frame. Glue these to the right side of the box.
9. Now fold on the score lines and burnish with the bone folder. Apply liquid glue to the ¼” flap and close the sides of the box. Allow the glue to dry, then close the bottom.
10. Stamp the greeting on a scrap of Basic White cardstock and cut it out with the label die. Punch a hole in one corner with the Take Your Pick and thread a length of Linen thread through the hole. Tie a knot in the thread and adhere the knot to the top corner of the box with a mini glue dot.
11. Use the Dark Pumpkin Pie blend to color about 6 inches of the White ¼” crinkled seam binding.
12. Tie an overhand knot in the seam binding and adhere to the corner over the Linen thread knot with another mini glue dot.
Put a flameless tealight in the box to use as a décor item as shown or fill a small cellophane bag with candy and put it in the box.
5 Ways to use Washi Tape for Creating Halloween Cards
Halloween is one of my favorite holidays. I love the colors, costumes, and handing out candy to the trick and
treaters. I am so excited about Stampin’ Up! bring back washi tape. Glitter Washi Tape is found on page 57
(159973) in the July-December Mini Catalog. It’s been a while since we have had this product and I wanted to
show you some different ways to create cards with this beautiful glittery washi tape.
1st card – The Punch
Take a small piece of 3x3 thick basic white card stock.
Add the glitter washi tape to the cardstock at an angle. I use my silicone craft pad to help me out
Once you finish taping your cardstock, cut off all the overhangs of washi
Put the cover basic white into the Witch Hat Builder Punch. (159856). Punch out the witch’s hat.
Assemble the card:
Stamp set: Bewitching Bundle (159857)
Cardstock: Black & White Designs DSP (159861), Pumpkin Pie (105117), Basic Black (121045), Basic White
(159276)
Ink: Versa Mark (102283), Black Basic Embossing powder (155554)
Accessories: Small wobbles, Pumpkin Pie Marker, Layered Circle die cuts (151770), Stampin’ cut & Emboss
machines Mini – (150673) Large – (149653), Glitter Washi Tape (159973), Adhesive of your choice, Silicone
Craft Pad (127853)
Yes, my witch’s hat moves. Remember to decorate the inside of the card and your envelope!
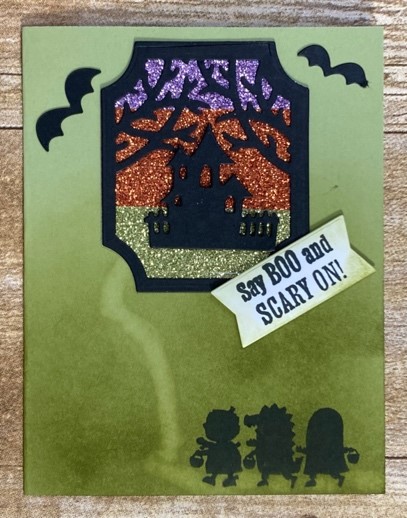
2nd Card – Die Cuts
Do all the same steps as above but put the washi tape on the basic white card stock in a straight line.
Use the Stampin’ emboss & cut machine to die-cut your image
Assemble the card:
Stamp set: Scary Cute Bundle (159852)
Cardstock: Old Olive (100702), Basic White (159276), Basic Black (121045)
Ink: Memento (132708), Old Olive (147090)
Accessories: Stampin’ cut & Emboss machines Mini – (150673) Large – (149653), Glitter Washi Tape (159973),
Blending Brushes (153611), Color Lifter Stampin’ Blends (144608), Dimensionals (104430), Adhesive of your
choice, Silicone Craft Pad (127853)
3rd Card – Tape on DSP paper
• I wanted straight lines as a background for the DSP. (You can also use washi in diagonal lines). Cut off the overhang.
Assemble your card:
Stamp set: Scary Cute Bundle (159852)
Cardstock: Pumpkin Pie (105117), Basic White (159276), Basic Black (121045)
Ink: Memento (132708)
Accessories: Stampin’ cut & Emboss machines Mini – (150673) Large – (149653), Glitter Washi Tape (159973),
Scalloped Contours (155560), Adhesive of your choice, Silicone Craft Pad (127853), Dimensionals (104430)
4th Card – Frame
31⁄2” x 41⁄4” piece of Basic White
Took the glitter purple washi tape and made a frame around the end of the cardstock
Assemble the card:
Stamp set: Bewitching Bundle (159857), SAB Amazing Phrasing (159930)
Cardstock: Heather Highland (146986), Basic White (159276), Basic Black (121045)
Ink: Memento (132708)
Accessories: Glitter Washi Tape (159973), Adhesive of your choice, Highland Heather Stampin’ Blends Combo
(154887), Basic Black Stampin’ Blends (154843), Pastel Pearls (154571), Dimensionals (104430)
5th card – Background
Took a piece of Black & White Designs DSP and added glitter washi tape
Cut off the overlap
Assemble the card:
Stamp set: Bewitching Bundle (159857), Forever Ferns (152559)
Cardstock: Black & White Designs DSP (159861), Basic Black (121045), Basic White (159276), Heather Highland
(146986), Vellum (101856), Old Olive (100702)
Ink: Memento (132708), Real Red (147084), Pumpkin Pie (147086)
Accessories: Layered Circle die cuts (151770), Stampin’ cut & Emboss machines Mini – (150673) Large –
(149653), Glitter Washi Tape (159973), Adhesive of your choice, Silicone Craft Pad (127853), Forever
Flourishing (152714), Dots and Spots (159164), Ranunculus Dies (157976), Dimensionals (104430), Parakeet
Party (159196), Mini Glue Dots (103683)
I hope you enjoyed this tutorial! Thank you for stopping by!
Welcome to my blog! I'm so happy you decided to honor me with a visit. I will be sharing about my favorite pastimes - stamping, paper crafts, and my videos. My hope is that you will be inspired by the projects you see here. Please, feel free to return frequently. I might be of assistance in answering questions you may have by emailing me. Thank you for stopping by!


 Crinkled Seam Binding Ribbon")

")