Here’s a quick and easy way to add more texture to your cards using a household staple – packing tape!
I’m using the Sweet Candy Canes Bundle and the Sweetest Christmas DSP for my project.
Did you know the Sweetest Christmas DSP has candy canes that can be cut out with the Candy Canes Dies? I’ll be using one of those candy canes, although this technique works just as well with stamped images. I’m also using regular clear packing tape from the office supply store. You will need to choose an image that is smaller than your packing tape.
Pull out enough packing tape to cover your image. It should be sticky side up. I use a large paper clip to keep the roll in place.
Place your image face down on the packing tape and rub it well to get out any air bubbles.
Trim off any excess packing tape around the cardstock or DSP. Use your die to cut out the image. The image will be slick, so use plenty of washi tape to keep the die in place.
How easy is that?! And now I have a nice shiny candy cane. Just think of the possibilities! Ornaments, drinking glasses, windows, snow globes, fish bowls……. I’m sure you’ll think of many more ideas.
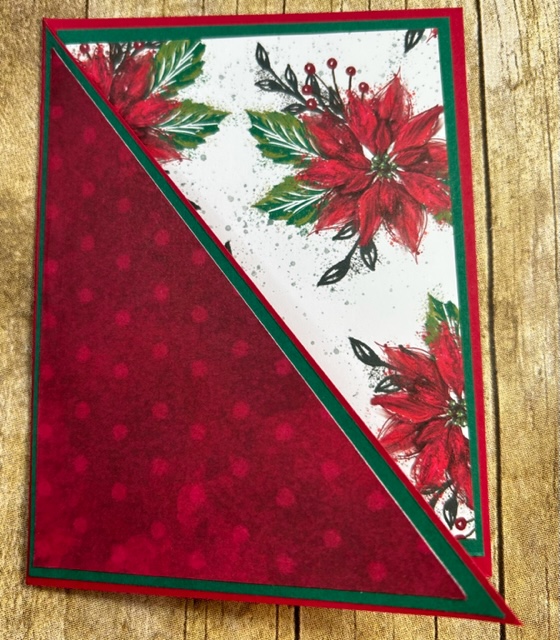
I used my candy cane to create the simple card below.
Everyone loves fun folds; they can really dress up a handmade card. This is one of my favorite fun folds, it is easy to put together and looks like it took lots of time to create! This fold is called a Diagonal Joy Fold.
Supplies:
Paper Trimmer
Real Red c/s
Shaded Spruce c/s
Boughs of Holly DSP
Basic White c/s
Adhesive
Leaves of Holly Bundle
Small and Big Boss
Real Red Ink
Bone folder
Wintry 3D Boughs – Pine/ Tree folder
Dimensionals
Wink of Stella
Measurements:
Real Red – 5 ½” x 8 ½” scored at 4 ½” and 3” x 8” score at 4”
Shaded Spruce – 4” x 5 ¼” (cut 2); 2-3/4″ x 3-3/4″ (x2); scrap pieces
Boughs of Holly DSP – 3 ¾” x 5” (cut 2)
Basic White - 2-5/8″ x 3-5/8″ (x2); scrap pieces
Let’s get started:
· Cut the Real Red card base diagonally from the top left by the SCORE line to the lower right. Crease well with a bone folder
· Cut the Shaded Spruce diagonally from the top left to the bottom right
· Cut the DSP diagonally from the top left to the bottom right
· Adhere all the diagonal pieces to the real red card base
· Adhere the Shaded Spruce to the inside of the card, DSP on top of the Shaded Spruce
· This is what it should look like when you have completed the above
Small card
· Fold 3 x 8 in half and crease well with your bone folder
· Adhere the Shaded Spruce to the top and inside the small card
· Put basic white in the embossing folder and run it through the Big Boss
· Adhere to the front of the card
· Cut 2 Shaded Spruce small, outlined leaves (The small boss works well)
· Stamp the berries in Real Red on a piece of basic white scrap paper and cut it out with the die cut and small boss
· On the 2nd piece of 2 5/8 x 3 5/8 of basic white, stamp your sentiment; adhere it to the inside of card.
· Add a 3/8” piece of DSP to the bottom of the basic white
· Adhere the leaves to the front of the card
· Add Dimensionals to the berries and attach them to the top of the leaves
(Pic 4)
· Attach the small card to the inside base card. (Make sure it is centered)
(Pic 5)
Hit the Wink of Stella against the bones folder adding some subtle sparkle to your card
Welcome to my blog! I'm so happy you decided to honor me with a visit. I will be sharing about my favorite pastimes - stamping, paper crafts, and my videos. My hope is that you will be inspired by the projects you see here. Please, feel free to return frequently. I might be of assistance in answering questions you may have by emailing me. Thank you for stopping by!


")
 Designer Series Paper")


")


