5 Ways to use Washi Tape for Creating Halloween Cards
5 Ways to use Washi Tape for Creating Halloween Cards

Halloween is one of my favorite holidays. I love the colors, costumes, and handing out candy to the trick and treaters. I am so excited about Stampin’ Up! bring back washi tape. Glitter Washi Tape is found on page 57 (159973) in the July-December Mini Catalog. It’s been a while since we have had this product and I wanted to show you some different ways to create cards with this beautiful glittery washi tape.
1st card – The Punch

-
Take a small piece of 3x3 thick basic white card stock.

Add the glitter washi tape to the cardstock at an angle. I use my silicone craft pad to help me out

-
Once you finish taping your cardstock, cut off all the overhangs of washi


-
Put the cover basic white into the Witch Hat Builder Punch. (159856). Punch out the witch’s hat.
-
Assemble the card:
Stamp set: Bewitching Bundle (159857)
Cardstock: Black & White Designs DSP (159861), Pumpkin Pie (105117), Basic Black (121045), Basic White (159276)
Ink: Versa Mark (102283), Black Basic Embossing powder (155554)
Accessories: Small wobbles, Pumpkin Pie Marker, Layered Circle die cuts (151770), Stampin’ cut & Emboss machines Mini – (150673) Large – (149653), Glitter Washi Tape (159973), Adhesive of your choice, Silicone Craft Pad (127853)
Yes, my witch’s hat moves. Remember to decorate the inside of the card and your envelope!
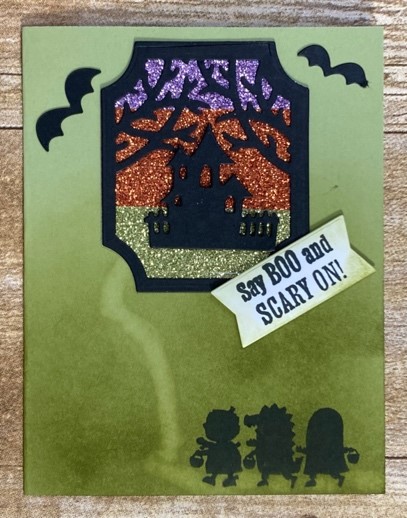
2nd Card – Die Cuts
Do all the same steps as above but put the washi tape on the basic white card stock in a straight line.

- Use the Stampin’ emboss & cut machine to die-cut your image

Assemble the card:
Stamp set: Scary Cute Bundle (159852)
Cardstock: Old Olive (100702), Basic White (159276), Basic Black (121045)
Ink: Memento (132708), Old Olive (147090)
Accessories: Stampin’ cut & Emboss machines Mini – (150673) Large – (149653), Glitter Washi Tape (159973), Blending Brushes (153611), Color Lifter Stampin’ Blends (144608), Dimensionals (104430), Adhesive of your choice, Silicone Craft Pad (127853)
3rd Card – Tape on DSP paper
• I wanted straight lines as a background for the DSP. (You can also use washi in diagonal lines). Cut off the overhang.

Assemble your card:
Stamp set: Scary Cute Bundle (159852)
Cardstock: Pumpkin Pie (105117), Basic White (159276), Basic Black (121045)
Ink: Memento (132708)
Accessories: Stampin’ cut & Emboss machines Mini – (150673) Large – (149653), Glitter Washi Tape (159973),
Scalloped Contours (155560), Adhesive of your choice, Silicone Craft Pad (127853), Dimensionals (104430)

4th Card – Frame
-
31⁄2” x 41⁄4” piece of Basic White
-
Took the glitter purple washi tape and made a frame around the end of the cardstock

Cardstock: Heather Highland (146986), Basic White (159276), Basic Black (121045)
Ink: Memento (132708)
Accessories: Glitter Washi Tape (159973), Adhesive of your choice, Highland Heather Stampin’ Blends Combo (154887), Basic Black Stampin’ Blends (154843), Pastel Pearls (154571), Dimensionals (104430)

5th card – Background
-
Took a piece of Black & White Designs DSP and added glitter washi tape
-
Cut off the overlap

Assemble the card:
Stamp set: Bewitching Bundle (159857), Forever Ferns (152559)
Cardstock: Black & White Designs DSP (159861), Basic Black (121045), Basic White (159276), Heather Highland
(146986), Vellum (101856), Old Olive (100702)
Ink: Memento (132708), Real Red (147084), Pumpkin Pie (147086)
Accessories: Layered Circle die cuts (151770), Stampin’ cut & Emboss machines Mini – (150673) Large –
(149653), Glitter Washi Tape (159973), Adhesive of your choice, Silicone Craft Pad (127853), Forever
Flourishing (152714), Dots and Spots (159164), Ranunculus Dies (157976), Dimensionals (104430), Parakeet
Party (159196), Mini Glue Dots (103683)


