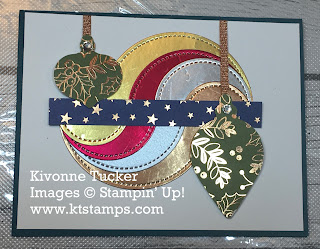
Circular Swirls Technique

by ktstamps, 7:21 PM

I love the look of this card.  I saw this card from my friend Lisa W and loved the circles.   I changed the colors and added my own flair...if you look closely, you can see the mistakes that were made.  
I looked into the video world of cardmaking and no one had made a "How to" video.   This is an easy technique and you have to have some creativity to make a nice card.   (I am still learning that creativity!)

I made this video over the last two weeks.   It has been hard getting back into the "How to Make a Video"  again.   I took a week just to video myself and then another week to remember how to edit the video, figure out how to use iMovie, upload from my phone to the computer, and upload it to YouTube.  WOW!  I did it!   I am hoping the next video will be easier!!!

I created this card in the video.

I hope you enjoy this video!  


These are the cards I created.  

I like the look of all of them!


Product List

A BLAST From The Past Technique

by ktstamps, 3:58 PM
I am still so grateful for all I have!   My friends are awesome, I have a good attitude for stamping again, I have customers who want to be on my newsletter, I am reaching my stamping goals, I have a wonderful family, I can retire...anyway...I am BLESSED!   I created this card with love, kindness, and thanksgiving.   

The technique is called  "Inlaid Embossing".   

Supplies you will need:
Punches
Die Cuts
Big Shot
Stampin' Cut and Emboss machine
Embossing Folder
adhesive/Dimensionals
Stamp set

One of the advantages to inlaid embossing is being able to create your own "Designer Series Paper" out of the shapes your choose.   

I took the small leaves from the Hello Pumpkins from the Paper Pumpkin Kit.   I randomly adhered the shapes (leaves and sentiment) to the base of my 3 3/4" x 5" Whisper White c/s.   I cut off the overhanging leaves.
I put the Whisper White cardstock in the Pinewood Planks 3D Embossing folder and ran it through the Stampin' Cut and Emboss machine.   (You could also use your Big Shot!)
I adhered my Whisper White to 4" x 5 1/4" piece of c/s.   I wrapped Black twine around the card twice.  
I placed that on the Mossy Meadow card base.  I also put a piece of 4" x 5 1/4" Whisper White c/s inside the card.   
I  took my Gathered Leaves dies and cut out leaves in Early Espresso, Cajun Craze, Mossy Meadow, and Bumblebee cardstock.  I adhered the leaves with Dimensionals and added 3 Rhinestone gems to the card.   

You are done!

I hope you will send me your "Inlaid Embossing" cards...I would love to see what you created.   

Thank you for stopping by.   

Product List

So many BLESSINGS!

by ktstamps, 7:01 PM

I am very grateful for all the things I have!   Being able to retire from teaching last year and be available for taking care of my mother-in-law and me.  Not doing a great job on me but I am there for my 93-year-old MIL with dementia. I am so thankful for all the students, colleagues, and staff members I worked with your over 40 years.   I put my stamping business on hold due to school obligations.   Now I am back and really having a blast learning how to post on my blog and Facebook.   I love creating cards and projects - it really helps me with being at home during this pandemic.   I am slowly putting together a  newsletter and I am so excited to do virtual parties!   

My life is good and I am soooo lucky!   Have a great Thanksgiving and thank you for all your blessings!   

Thank you for stopping by!    

On Tuesday, November 24th, the Merry and Bright Online Extravaganza start.   It's a one-day event.    10% off of selected items from the 2020-2021 Annual catalog.   This is a great time to ask for that stamp set, bundle, or Stampin' Cut & Emboss machine you have been drooling over. Please go to my website and place your order.   

Here is the list of excluded items.  

Have a cup of coffee or tea.   Take an hour for yourself as you comb through the catalog and create your list of wants.   

Have a great day and thank you for stopping by!


Stepping up your cards

by ktstamps, 7:09 PM
Last weekend I attended an online gather of Stampin' Up! Demonstrators and Staff.   The gather was call On Stage @ Home.   These usually take place at different locations; to bring together lots of old and new friends.   Because of COVID, Stampin' Up! decided to do this online.   It was so much fun.   We learned a lot about the 2 new CATALOGS coming out in January.  They told us we would have 2 - SALE-a-brations in 2021, the mini Catalog is wonderful - the colors, stamps, kits, dies, punches...I am looking forward to ordering.   The staff told us about changes and updates to the company.   AND...we had incredible demonstrators teach us and show us cards/products using some of the new stamp sets and bundles in the new catalogs.   It was a fabulous way to connect with Stampin' Up!  AND...I missed my friends a lot.   I missed Swapping!  In the next few months, you will see cards using the new stamps we were able to purchase.   (One is on my Facebook right now...it's stickin' cute!)

One of the ideas Stampin' Up! talked about was how to step up cards.   Starting with the new stampers who are on a budget to stampers who have been with you for years.   Being open to creating basic ideas for cards and then being able to create something for your long term friends who want a little more challenges around card making.  I feel I create more in the middle and I can scare people away who may not have the stamps, skills, or means to create like that.   

This will be my first try at taking a basic card and adding more challenges for those avid stampers.   

This is my basic card.   It uses a couple of cards of cardstock, some designer series paper, a stamp set, an ink pad, and a couple of embellishments.   (I realize I may have gone too far! LOL)  I used Crumb Cake and Early Espresso Card stock,  Ornate Thanks stamp set, Braided Linen Trim, Early Espresso ink pad, Metallic Pearls, Dimensionals, Rectangular Postage Stamp Punch, and Gilded Autumn Specialty Designer Series Paper (DSP).  (SU is out of the Gilded Autumn DSP)


I received this card from Jenn Lindamood a month or two ago.   I always knew it would be my "little more of a challenge" for stampers.   This card requires a Big Shot or Stampin' Cut & Emboss Machines.   This also challenges those who like to be "perfect" when it comes to lining strips of paper up evenly.  This card also uses the Crumb Cake, Early Espresso, Very Vanilla, and Copper card stock, Stampin' cut & emboss machine, Ornate Thanks stamp set, Gilded Autumn Specialty Designer Series Paper, Ornate Layer Dies, Tasteful Textile 3D folder, and Cajun Craze ink pads.  

This is a card for the avid stamper.   It can be tricky with a fancy fold.   I added a leaf at the bottom for color and to draw attention to the fancy fold.   I used Early Espresso, Very Vanilla, and Copper Card stock, Ornate Thanks stamp set, Ornate Layer Dies, Big Shot or Stampin' Cut & Emboss Machine, Braided Linen Trim,  Gathered Leaves Dies, Scalloped Tag Topper Punch, Gilded Autumn Specialty Designer Series Paper, Dimensionals, and an Early Espresso ink pad.

Please let me know what you think about the cards.   My hope is to continue doing step-up cards so everyone feels they are apart of my creation.

Thank you for stopping by today!

Product List
© Stampin Anyone? · THEME BY WATDESIGNEXPRESS